Home

Basic QoS Configuration in JunOS

Leave a comment

Default traffic allocation dalam Juniper Router itu 1:19, alias 95:5

95% traffic untuk Best Effort (BE) dan 5% traffic sisa untuk Network Control (NC)

(mungkin lo harus nyebrang2 artikel dulu untuk liat best-effort dan network control dalam QoS itu apa dan gunanya apa)

Link ane

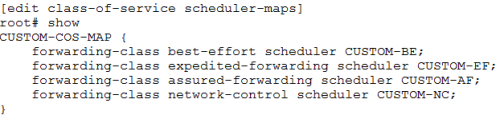
Dalam juniper, BE dan NC ini adalah 2 dari 4 forwarding-class yang bisa dikonfig

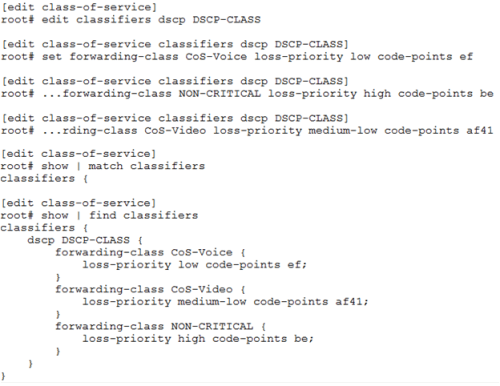
Lets see the “show class-of-service”

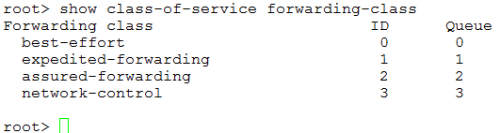
Ada BE, NC, AF (Assured-Forwarding), dan EF (Expedited-Forwarding)

If you familiar with AF31, AF42,atau EF…yup…this is DSCP (differentiated service code point)

=======================================

Setting CoS (Class of Service) for specific address(es)

Contoh kita pengen LAN kita (10.0.0.0) pake CoS EF

First, create the rule…firewall rule

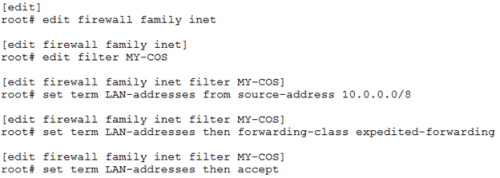
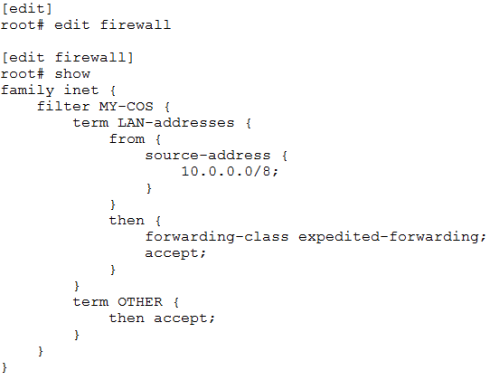
Jgn lupa yang laen juga (implicit deny/silent discard soalnya nanti)

The show

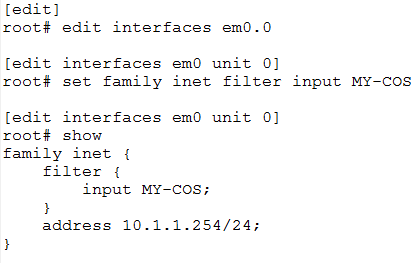
Second, apply to the interface (the logics are same right?!?)

Eh…kita settingnya kan pake Expedited Forwarding, dapet brp bandwidth tuh?? Kan blum diset ??

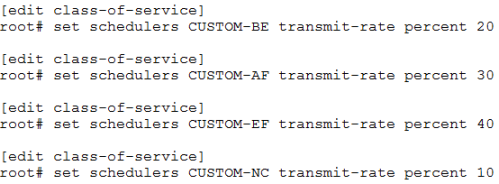
Bisa ga di rubah untuk BE 20%, AF 30%, EF 40%, dan NC 10% ??

Bisa…nyok kita setting

======================

Changing Class-of-Service priority bandwidth between Queue

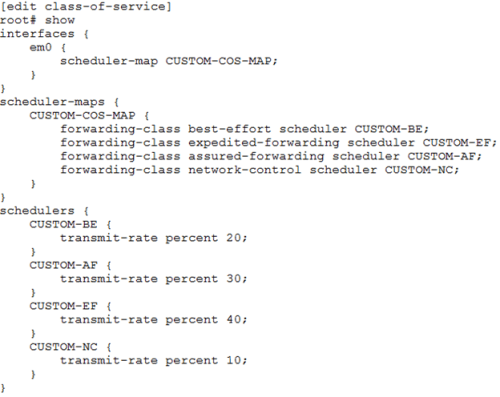
First, create CUSTOM MAPPING for CoS

Lets see the show

Second, we DEFINE that custom mapping (CUSTOM-BE and his friends)

Third, set the interface that we want to apply that Custom CoS Mapping

And here’s the complete configuration

====================================

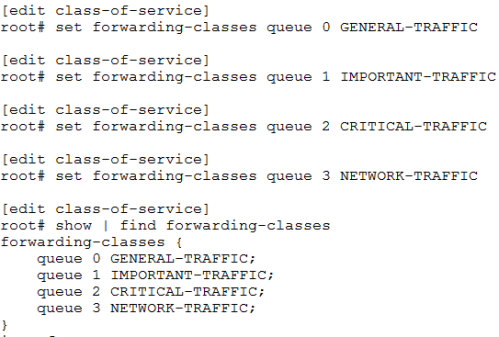
Andddd…by the way…kita bisa kasi nama buat masing2 queue loh

Trus klo mau kasi custom dscp trus apply ke interface gimana?? (ini bukan basic lagi namanya -_-; )

Trus masukin ke interface (di hierarki class-of-service, bukan di interfacenya)

Route Filtering and Prefix-List in JunOS

Leave a comment

Now we discuss about prefix-list and route-filtering di Juniper, topologinya kek gini:

Dan interface loopback di junipernya seperti ini:

Ceritanya kita mo filter ini network2 yang ada di juniper supaya ga di advertise ke Cisco, initial routing table-nya kek gini

(pake RIP, liat aja di previous config yang gw kasi)

=============================

Filtering using Prefix-List

Contoh, dari route rip yang di advertise Juniper, kita hanya pengen network yang depannya 2.1.X.X untuk di kasi ke Cisco

Penjelasan:

  • Kita create prefix-list untuk network yang kita mau filter dengan namanya “ONLY” (nama bebas sebenernya)
  • Trus kita bikin statement bahwa prefix2 tersebut di-accept (diterima) dengan nama “ACCEPT” (again…nama bebas)
    • Keyword “orlonger” kita bahas dibawah nanti
  • Statement yang kita buat tadi lalu kita masukkan ke policy punya RIP dengan keyword “term EXPORT policy ACCEPT

Nah, kita masukin ini policy RIP ke konfigurasi RIP itu sendiri

We’ll see…in Cisco

===========================================

Filtering using Route-Filter

Note: untuk filtering pake prefix-list ato route-filter sebenernya bisa langsung sih, ga usa pake policy segala (tapi lebih rapih klo pake policy)

Contoh, kita bisa bikin langsung kek gini:

Set policy-options policy-statement EXPORT-RIP term EXPORT from route-filter 2.3.0.0/16 (langsung ke EXPORT-RIP-nya, tanpa harus di pasang ke policy route-filter tersendiri yaitu ke DO-NOT-ADVERTISE)

Nyok kita liat di Cisco

==============================

FILTERING TERMS

Ini yang tadi mau gw bahas…apa itu longer, orlonger, dll

Jadi dalam Juniper Filtering ada optional condition yang kita bisa pilih untuk filtering route

Apa aja itu:

  • Exact: filtering exact prefix (“from route-filter 10.1.1.1/24 exact“, yang di filter ya network itu aja)
  • Orlonger: filtering network itu dan yang lebih besar mask-nya (“from route-filter 10.1.1.1/24 orlonger“, yang di filter ya 10.1.1.1/24../25../26 dst)
  • Longer: filtering network yang lebih besar dari network yang sudah disebutkan (jadi /24-nya mah kaga ke filter)
  • Upto: ini kek range prefix (“from route-filter 10.1.1.1/24 upto /27“)
  • Prefix-length-range: lebih spesifik daripada upto (“from route-filter 10.1.1.1/24 prefix-length-range /27-/29“)
  • Through: gabungan orlonger dan upto (“from route-filter 10.1.1.1/24 through 10.2.2.0/25“)

That’s it folks…

Older Entries