Home

NAT Configuration

Leave a comment

NAT itu terbagi 2, Statis dan Dinamis

Tipe2 dari Statis dan Dinamis juga banyak…kita bahas satu2

==============================

Important Keyword

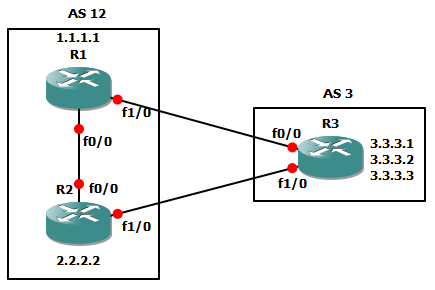
Kita bikin di interface loopback1 “ceritanya” ada LAN, pake keyword secondary, jadi ada 3 ip di satu interface (harus 1 network yah IP-IP secondary nya)

Trus ip route ke loopback R2, pake default route aja

Nah…important keyword dalam implementasi NAT adalah ip nat inside/ip nat outside

Di interface loopback1 (ato interface yang mengarah ke LAN Network) kita ketik ip nat inside, supaya si R1 tau…ini IP yang mau ditranslate

Di interface fa0/0 kita kasi ip nat outside, supaya R1 tau…ini interface tempat hasil translate-an IP nya

Kadang mudahnya gini:

  • Di suatu interface yang kita “mark” ip nat inside…tandanya itu Interface yang mengarah ke Network Local/LAN (Private IP)
  • Klo di interface itu kita “mark” ip nat outside…berarti interface ini tempat IP Public…mengarah ke WAN/ISP

===========================

Static NAT

1:1 Translation (1 buah IP di translate/dirubah ke 1 buah IP lainnya)

Di R2 juga sama, sekarang kita liat konfigurasi Static 1:1 translation
nya dibawah ini

Konfigurasi diatas artinya…”woi router…interface yang gw “mark” ip nat inside tolong mentranslate/rubah ip 1.1.1.1 ke 12.12.12.11 (ato 1.1.1.2 ke 12.12.12.2)

Coba kita ping (pake source yah…jadi ceritanya kita ping dari LAN kita, klo ping dari routernya sendiri ga akan dapet NAT-nya)

Nah..kita bisa liat…IP 1.1.1.1 (Inside Local) di translate ke 12.12.12.11 (Inside Global)

Begitu pula IP 1.1.1.2 ditranslate ke 12.12.12.12

Apaan sih Inside Global dan Local serta Outside Local dan Global?!

  • Inside Local = IP yang terdapat di interface yang sudah di mark “ip nat inside”
  • Inside Global = ini yang di mark “ip nat outside”
  • Outside Local = biasanya IP tetangganya (directly connected neighbor)
  • Outside Global = biasanya tempat tujuan berada

IP to Interface IP (Mapping 1 buah IP ke IP Interface)

Ini artinya “tolong translate IP berikut ini (1.1.1.1/1.1.1.2) ke IP yang ada di Interface fa0/0

Nah…diatas kita coba ping dari 1.1.1.1 trus dari 1.1.1.2, yang keliatan adalah IP yang terakhir kali nge-ping (1.1.1.2, IP 1.1.1.1 sudah di delete dari nat translation-nya)

Pool Network to Pool Network (define network untuk ditranslate lalu define network hasil translate)

Lebih fleksibel, configurasinya lebih ga ribet (daripada kita harus define 1-1 ip yang di translate…mending define “range” ip nya aja)

Ini artinya “tolong tanslate network 1.1.1.0 ke network 10.0.0.0 dengan prefix /24

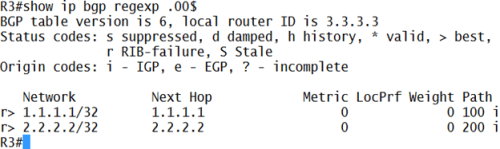
Verifikasinya tinggal liat gambar diatas

Static Extendable (1:2 translations)

Jadi 1 IP ditranslate ke 2 IP atau lebih

Ini artinya “tolong translate 1.1.1.1 ke ip 10.1.1.1 ATAU 20.1.1.1“, dengan keyword extendable

Ketika R2 mau mengakses 1.1.1.1, dia bisa pake 10.1.1.1 ato 20.1.1.1, contoh kita mo telnet dari R2 ke R1:

Create telnet dulu, trus coba telnet ke 10.1.1.1 dan 20.1.1.1 (untuk ke 1.1.1.1)

===================================

Dynamic NAT

ACL to Range IP (IP yang mau di translate di filter dulu oleh ACL trus di translate ke pre-defined range IP)

Konfigurasi diatas maksudnya “tolong translate IP-IP yang ada di pool DINAMIS ke IP 12.12.12.11 sampai 12.12.12.13 dengan prefix /24

Create juga pool dan ACL nya yah (jangan lupa)

Hasil nat translation-nya bisa di lihat diatas

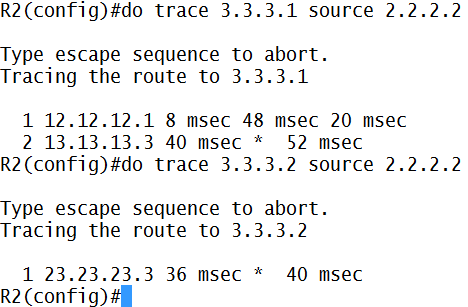
Reverse ACL to Range IP (klo tadi yang di translate adalah ip nat inside source, sekarang ip nat inside destination)

Tipe NAT seperti ini berguna klo ada traffic dari luar mau masuk, untuk telnet router kita misalnya

Tentu IP yang mau telnet itu harus diizinkan dulu (baca: dipermit ACL) untuk di translate ke IP Local

Pada gambar diatas..R2 telnet dengan menggunakan IP 12.12.12.11 dan di translate ke IP 1.1.1.1 (“show ip nat tr”-nya dibawah)

NAT Overload (IP ke Interface)

Nah…biasanya kita pake ginian nih, ini tipe NAT paling populer

Disini maksudnya “tolong translate IP-IP yang di permit oleh ACL nomor 1 ke IP yang ada di Fa0/0

Overload = cek article NAT gw tentang overload (also known as PAT – Port Address Translation)

Kok sama ya…kek yang di static? Ya memang…yang membedakan statis dan dinamis adalah cara router memilih IP mana saja yang mau ditranslate (static = input sendiri, dinamis = pake ACL/Pool)

NAT Overload (IP ke Pool IP)

Like the name said…sama2 overload…tapi IP yang “lolos” dari ACL akan di translate ke Pool IP yang sudah disediakan

Contoh configurasi:

Untuk nge-tes nya…kita harus bareng2 dari 2 komputer (misalkan) ping ke R2…baru di show ip nat tr

===============================

Dual NAT

Will be updated soon…

NAT Load balancing (salah satu contoh dual NAT)

BGP Configuration (part 4)

4 Comments

Part 1, Part 2, and Part 3 here

Although there is many bgp keywords/features that i’m not mentioning here, let’s end it with 4 important features left:

  • BGP Confederation
  • BGP Route-Reflector
  • BGP AS Filtering with Regular Expression (Regexp)
  • BGP Community

The Wrap-up after I learn a little about this protocol…

Holy Sh*t…This is the most complex routing protocol I ever learn haha

============================================

Route Confederation

Remember when we talk about BGP Full Mesh…lets take a look at topology below

It would be bothersome if we must configure bgp peering one by one right ?

In BGP, one way to avoid this is Route Confederation…we divide one big AS into smaller AS like the topology below

Lets see the configuration on eBGP of AS 1 and AS 2(R5 and R6)

Explanation:

  • In R5:
    • Router bgp [sub-AS number]…we don’t configure main-AS as the number in BGP Confederation
    • Confederation identifier explain the main AS the router resides
    • Confederation peers explain other iBGP sub-AS that directly connected through this sub-AS
    • Dont forget to add each neighbors with their respectives number
    • Add network keyword to ensure ping successful to R6 in AS 2 from AS 1 routers (if you ping without source)
  • In R6:
    • Just common e-BGP peering configuration

After e-BGP peering successful, lets go to other routers

Explanation:

  • In R3:
    • Same confederation identifier, to tell this router that he belongs to AS 1 (main-AS)
    • Confederation peer with sub-AS 5 and sub-AS 12 as his directly connected sub-AS neighbor
    • Dont forget to add each neighbor with their respectives number
    • And also next-hop-self (remember part 2 about BGP rules)
    • And add the network (just like in IGP configuration) to ensure successful communication between routers
  • In R4
    • We only add confederation identifier because R4 achieve confederation peering from R3
    • Dont forget about neighbor and also add network like you’ve done in IGP configuration (if you ping without source)

And so on with R1 and R2, the configuration is roughly the same like R3 and R4

==========================================

Route Reflector

Another way aside from Route Confederation is Route Reflector

Route Reflector is more processing friendly, because we can choose some routers to mirror their peering to neighbors

For example, in topology below R4 want to achieve route 3.3.3.3 from R3 but we dont want to connect them directly, we can use route-reflector to achieve this

Initial configuration (R1 through R4)

Here’s the initial achieved BGP network in R4 (or R3)

Now we add route-reflector…

Explanation:

  • To achieve route-reflector(mirror)…we need client/mirror to catch
  • So we set neighbor R3 (23.23.23.3) and R4 (24.24.24.4) to catch each other via route-reflector-client keyword

Now we look at R4

Now R4 (or in R3 respectively) get each other route via mirroring/reflector from R2

=========================================

BGP Route Filtering (Regular Expression/Regexp)

In the real world…one of most useful of regexp implementation is we must filter which AS that we wish to see, because of many ISP network advertised to our router

Here’s is initial show ip bgp with the respective topology

Imagine there is more network to display when we use show ip bgp

So…we filter using BGP Regular Expression (this feature comes up not only in IP Network…in programming regexp exist too) or just call it Regexp

Example…we want to filter only AS 200 to came up in display

Or we want only AS with the second and third number using 0 (zero) to display

The first one = ^200$

  • The “^” mark is to define..”it start with number on the right after this mark”…
  • The “$” mark is to define..”it end with number on the left before this mark”…
  • So…^200$ means that this regex is filtering AS that start with number 2,0, and then ends with 0

The second one = .00$

  • The “.” Mark is to define…”any number”
  • So…”.00$” means that any AS-path number can be displayed as long as followed by two 0’s behind

There’s many symbol to use…use this as reference

=======================================

BGP Community

remember BGP Configuration part 2 when we learn about how to change BGP “metric” that called path attribute…

this Community works that way…change path attribute

but…instead of configuring on OUR Router(a.k.a costumer router) solely, we configure it at PE Router (ISP Router)

so…BGP Community works this way: ISP influence costumer router for deciding best path for the route and then reduces costumer configuration on their router

ISP: “hey…i’m tagging 3.3.3.1 network with 12:300 community value…use it accordingly

Costumer: “ok…for the network that come from ISP with community value 12:300…i will use [insert path attributes here]

ISP:”new update…there is a new best route, its 3.3.3.3..community value it still the same…use it well

Costumer:”no problem

ISP:”guys…there’s…

Costumer:”Dude !!…as long as community value is still the same, just pass it up here..it’s automatically configured on our router

let’s see the example

community 1

we try to influence BGP path decision (example: local-pref) process from R3 (lets say this is ISP) to R1 and R2 (costumer)

community 2

above picture is the initial network advertised to R1 via R3 with default local-pref value (100)

let configure BGP Community on R3 first and then configure on R1 & R2 respectively

community 3

explanation:

  • send-community keyword is to make this router send community information to this neighbor
  • and then create route-map for each peer (below picture) to set community value and filter which his network get the community with outbound traffic (we want to send the packet right? not receive it)

community 4

explanation:

  • create route-map to permit which network that get the community tag
  • and set community tag, there is 2 version…Cisco Version and IEEE version
    • if we set, for example, set community 12345…this is Cisco version
    • but if we set, set community [AS:Tag Value]…this is IEEE version
  • to use IEEE version we must use ip bgp-community new-format
  • and then create access-list (below picture) to permit the network that we want to tag with community
  • so, for R1 use community value 100:300 to network 3.3.3.1
  • but for R2, use community value 100:250 to network 3.3.3.1
  • the aim is, if R2 want to send packet to 3.3.3.1, he must not send it directly to R3 (verification at the bottom page)

but hey…above configuration is 100:300 right?? isn’t it should be 12:300??

yes..a typo >_< , initially I want to create AS 100 instead of AS 1

but it doesn’t matter…have s*x…i mean, it still working properly (for now) haha

I honestly dont know why is it working…eventhough the AS is typo

and then…why you use 300 or 250 ?!? that value is just a TAG for community, its free to choose (i think)

now let’s take a look on R1 and R2

community 5

explanation:

  • create neighbor with route-map that use community with inbound traffic (receive packet)
  • match it with community ACL, ip community-list [number] permit [community value]
  • and if it match, tag it with set local preference [value]
  • if we dont use route-map [name] permit 30, all traffic that don’t match with previous route-map will be dropped
  • and R2 configuration is roughly the same (below picture)

community 6

let’s see the effect:

comm 1

now R1 and R2, based on community value that R3 sent, will react to 3.3.3.1 and 3.3.3.2 route accordingly

let’s trace it…

community 8

see…R2 send packet to 3.3.3.1 is through R1 (12.12.12.1) first

but to 3.3.3.2…send directly

verification

comm 2

and then, there are special values for community attributes

no_export: do not advertise community to outside AS (remember..community is “transitive-optional BGP attributes”, see BGP Theory)

no_advert: do not advertise to any other peers

local_as: do not advertise outside the local confederation sub-AS

example configuration:

comm 3

where is the result/effect of this configuration??

later (or not at all), i’m going crazy with all these configuration (now you ask me to add another-AS to see the result @_@)

let’s take a break…if i have free time (and motivation haha), i will post it

ok…done, i’m back with bahasa Indonesia typing again hahaha

Older Entries Newer Entries